
Translife Footwear Knowledge Centre
Heel Height Guide
Understand heel measurements, platforms, stability and walking technique before choosing a height you can wear confidently.
This practical heel height guide helps crossdressers and transgender women compare feminine footwear, understand why shoes of the same height can feel different and choose heels suited to their experience and intended use.
- Compare low, medium, high and statement heel heights.
- Understand heel shape, platforms and effective heel height.
- Improve comfort, balance and walking confidence.
Explore This Guide
Find the Heel Height Advice You Need
Follow the complete heel height guide in order or go directly to the section most useful to you.
Understanding the Basics
Why Heel Height Changes More Than the Look of a Shoe
Heel height affects balance, posture, pressure beneath the foot and how naturally you can walk. The right choice is not simply the highest heel you like—it is the height and shoe construction that suit your experience, intended use and comfort.
Consider the Complete Shoe
Why Two Heels of the Same Height Can Feel Completely Different
The advertised measurement tells you the visible height at the back of the shoe, but it does not explain the complete wearing experience. Heel width, heel position, platform depth, toe shape, cushioning and ankle support can all make one pair feel noticeably easier or harder than another.
A broad four-inch block heel with a supportive ankle strap may feel more secure than a lower stiletto with a narrow heel tip and loose fit. This is why a useful heel height guide must consider stability, effective height and shoe construction alongside the advertised measurement.
Before Comparing Heights
Four Factors That Change How a Heel Feels
-
Heel Shape
A broader base generally provides more floor contact and requires less ankle correction.
-
Platform Depth
A front platform can reduce the effective incline even when the visible heel appears very high.
-
Secure Fit
Heel slippage, excess width or cramped toes can make any heel height more difficult to control.
-
Intended Use
A heel suited to a short photoshoot may not be practical for walking or several hours of wear.
Compare the Main Heel Heights
Heel Height Guide: Low, Mid, High and Extreme Heels Compared
Compare the main heel-height ranges and see how additional height may affect comfort, posture, balance and walking confidence. These are practical starting points rather than fixed rules because heel shape, fit, platform depth and ankle support also change how a shoe feels.
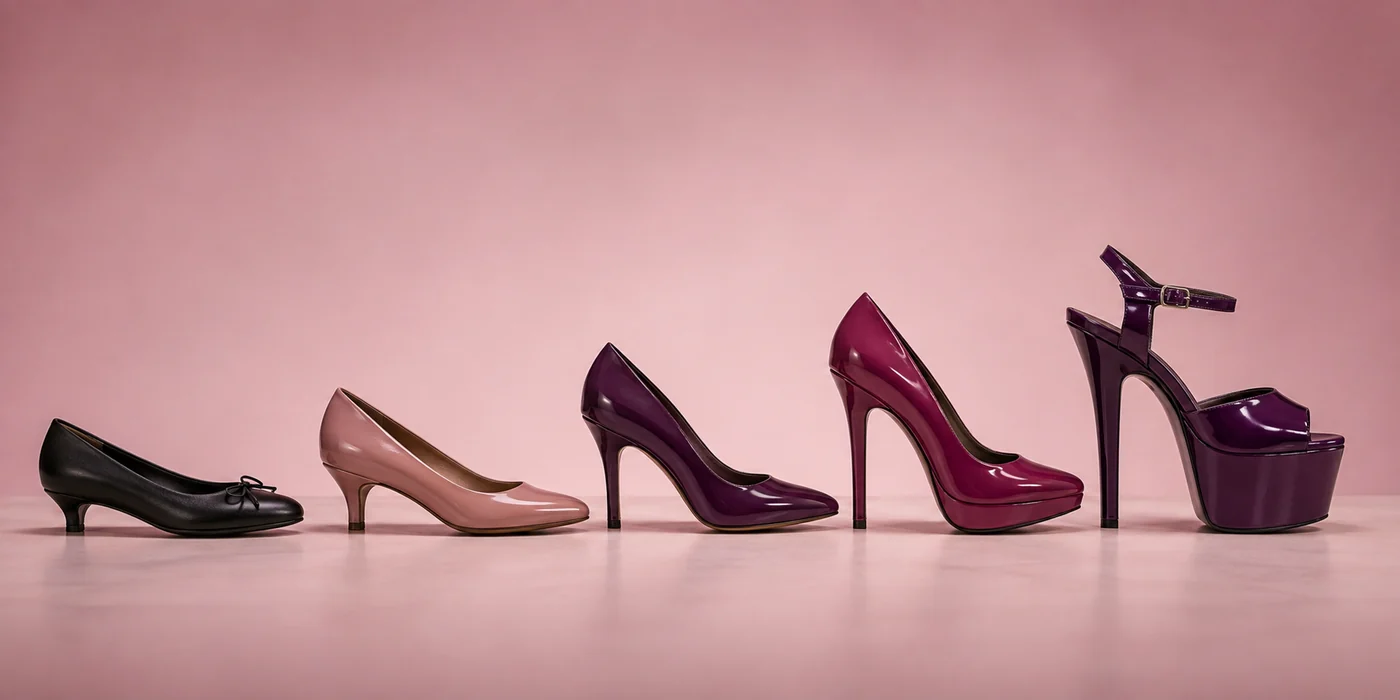
Heel-Height Ranges
What Different Heel Heights May Feel Like to Wear
Increasing heel height generally creates a steeper foot angle and demands more balance. A secure block heel or supportive platform may still feel easier than a lower, narrow stiletto.
-
Everyday Starting Point
1–2 Inch Low Heels
1–2 inches 2.5–5 cm
Low heels provide a subtle lift while keeping the foot relatively close to its natural position. They are often the easiest introduction to feminine heels.
- First-time heel wearers
- Daytime or longer wear
-
Versatile and Feminine
2–3 Inch Mid Heels
2–3 inches 5–7.5 cm
Mid heels create a recognisably feminine shape without the steep incline associated with taller heels. They can balance elegance with everyday practicality.
- Developing walking confidence
- Daytime and evening outfits
-
Classic High-Heel Styling
3–4 Inch High Heels
3–4 inches 7.5–10 cm
High heels create a more noticeable change in posture and leg line. They usually require greater control, especially without a platform or ankle support.
- Practised heel wearers
- Evening and occasion outfits
-
Dramatic Feminine Impact
4–5 Inch Very High Heels
4–5 inches 10–12.5 cm
Very high heels produce a dramatic appearance and a steeper foot angle. Platforms, ankle straps and broader heels can make some designs more manageable.
- Experienced heel wearers
- Glamorous or photographic outfits
-
Specialist Statement Footwear
Extreme and Platform Heels of 5 Inches or More
5 inches and above 12.5 cm+
Extreme heels are generally chosen for dramatic styling, photography, performance or shorter periods of wear. Many include a substantial front platform.
Measuring Heels Correctly
How to Measure Heel Height Accurately
Measure vertically at the back of the shoe, from the floor to the point where the heel joins the sole. This method gives a consistent heel measurement and avoids the exaggerated result produced by following a curved or sloping heel diagonally.
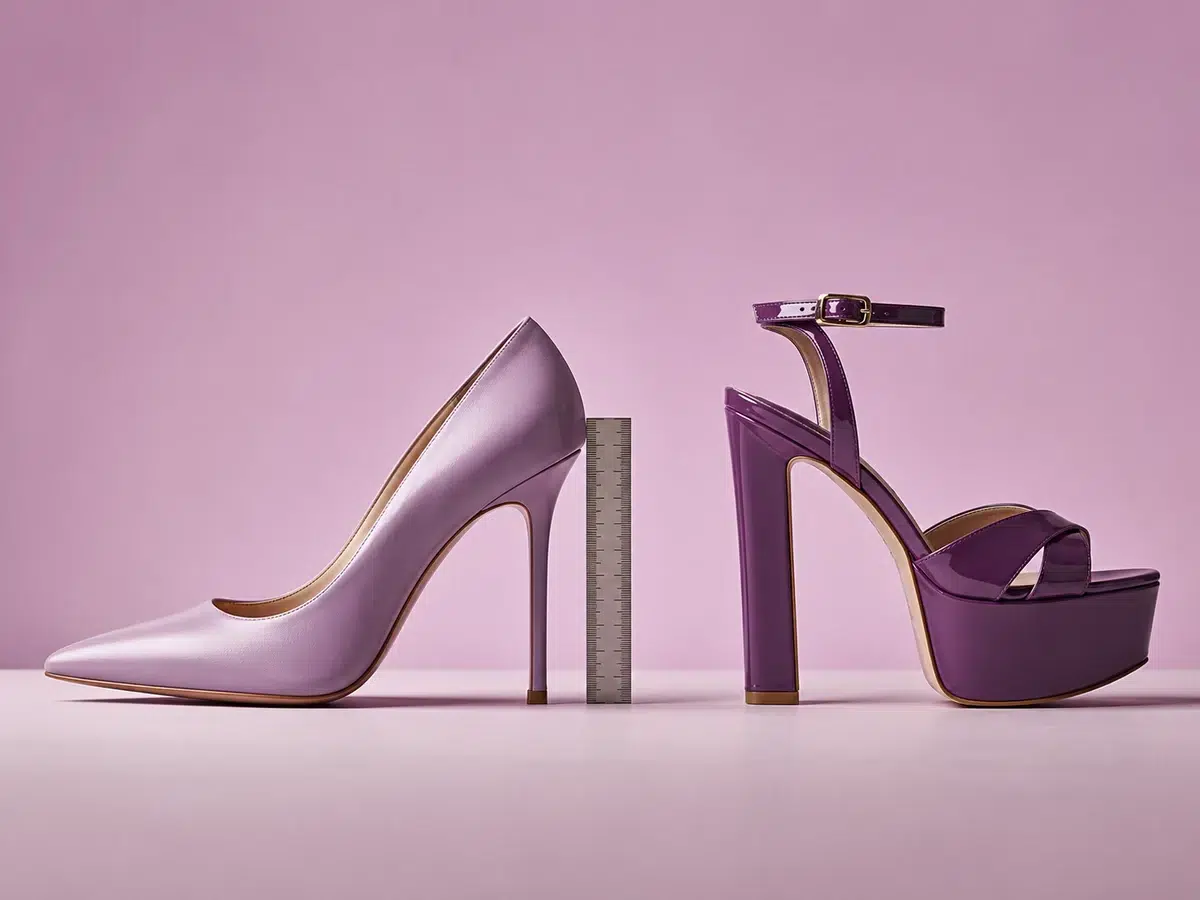
The Standard Method
Measure from the Floor to the Heel Seat
Stand the shoe naturally on a firm, level surface. Position a ruler vertically beside the rear of the heel and read the measurement at the point where the heel connects to the main body or sole of the shoe.
Do not angle the ruler or follow the heel’s curve. A diagonal measurement travels farther than the true vertical height and can make the heel appear taller than it is.
Four Simple Steps
The Correct Heel-Measuring Method
-
Use a Level Surface
Stand the shoe naturally so the sole and heel tip rest in their normal wearing position.
-
Keep the Ruler Vertical
Hold the ruler upright beside the back of the shoe rather than following the heel’s slope.
-
Measure to the Heel Seat
Read the height where the heel connects to the sole or main body of the shoe.
-
Record the Platform Separately
Measure the sole beneath the ball of the foot as a separate figure when the shoe has a platform.
Two Different Measurements
Visible Heel Height and Platform Depth
Record these measurements separately. Their relationship helps explain why two shoes with the same advertised rear heel can feel different when worn.
Rear Measurement
Visible Heel Height
Measure vertically from the floor to the heel seat. This is the figure most commonly used in footwear descriptions.
Front Measurement
Platform Depth
Measure the sole thickness beneath the forefoot. Module 6 explains how this changes effective heel height and foot angle.
Avoid Inaccurate Results
Common Heel-Measuring Mistakes
Following the Curve
Measuring diagonally along a stiletto exaggerates the true vertical heel height.
Tilting the Shoe
Holding the shoe in the air changes its natural angle and makes the result inconsistent.
Measuring to the Upper
Stop at the heel seat rather than continuing into the rear upper of the shoe.
Ignoring the Platform
Record the front platform separately because it changes how steeply the foot sits inside the shoe.
Height Is Only Part of the Story
How Heel Shape Affects Stability and Comfort
Two shoes with the same heel height can feel very different. Heel width, heel-tip size and floor contact all influence balance, ankle control and walking confidence. This section of the heel height guide compares the most common heel shapes and explains what to look for.
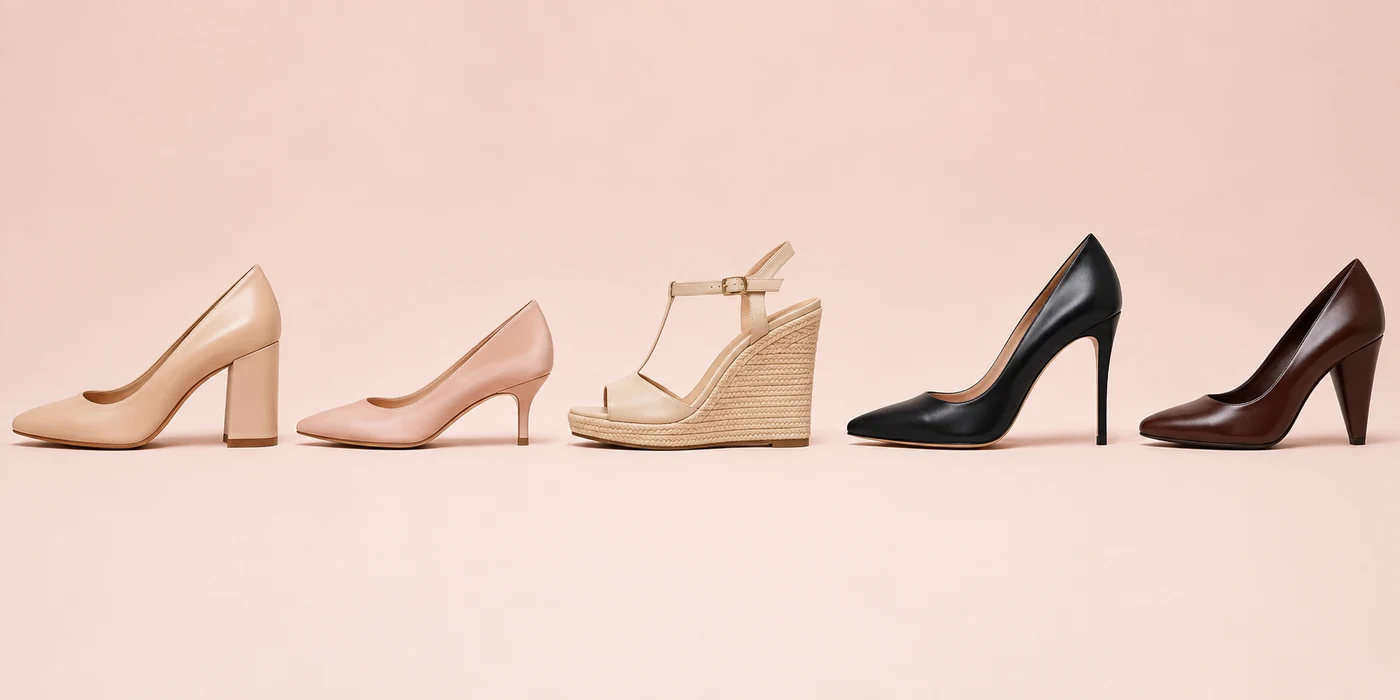
Compare Common Designs
Five Heel Shapes and How They Usually Feel
These ratings are general guidance. Height, fit, heel position, ankle support and the surface beneath you can change the result.
-
Strong Everyday Support
Block Heels
Block heels use a broad, solid base that provides more floor contact than a narrow heel. They are often one of the easiest ways to add height while retaining a secure feel.
- Broad rear support area.
- Good sideways stability.
- Often practical for longer wear.
-
Subtle Feminine Lift
Kitten Heels
Kitten heels are normally low and slender. Their lower height reduces the incline beneath the foot, although the narrow heel tip still requires careful placement.
- Lower foot angle.
- Useful for daytime styling.
- Needs care around gaps and soft ground.
-
Continuous Sole Support
Wedge Heels
A wedge extends beneath much of the foot instead of supporting the shoe through a separate heel. The larger base can feel stable, although tall wedges may be heavy or less flexible.
- Large supporting surface.
- Less likely to catch in narrow gaps.
- Tall designs can feel rigid.
-
Classic Dramatic Styling
Stiletto Heels
Stiletto heels create a slim, dramatic silhouette, but the small heel tip provides limited floor contact. They usually require the most precise placement and ankle correction.
- Very small contact point.
- More demanding on uneven surfaces.
- Best approached gradually.
-
A Graduated Middle Ground
Cone and Tapered Heels
Cone and tapered heels are wider where they join the shoe and narrow towards the floor. They can retain a delicate appearance while offering more structure than a fine stiletto.
- Broader connection at the heel seat.
- Available in many different heights.
- Stability depends on the heel-tip width.
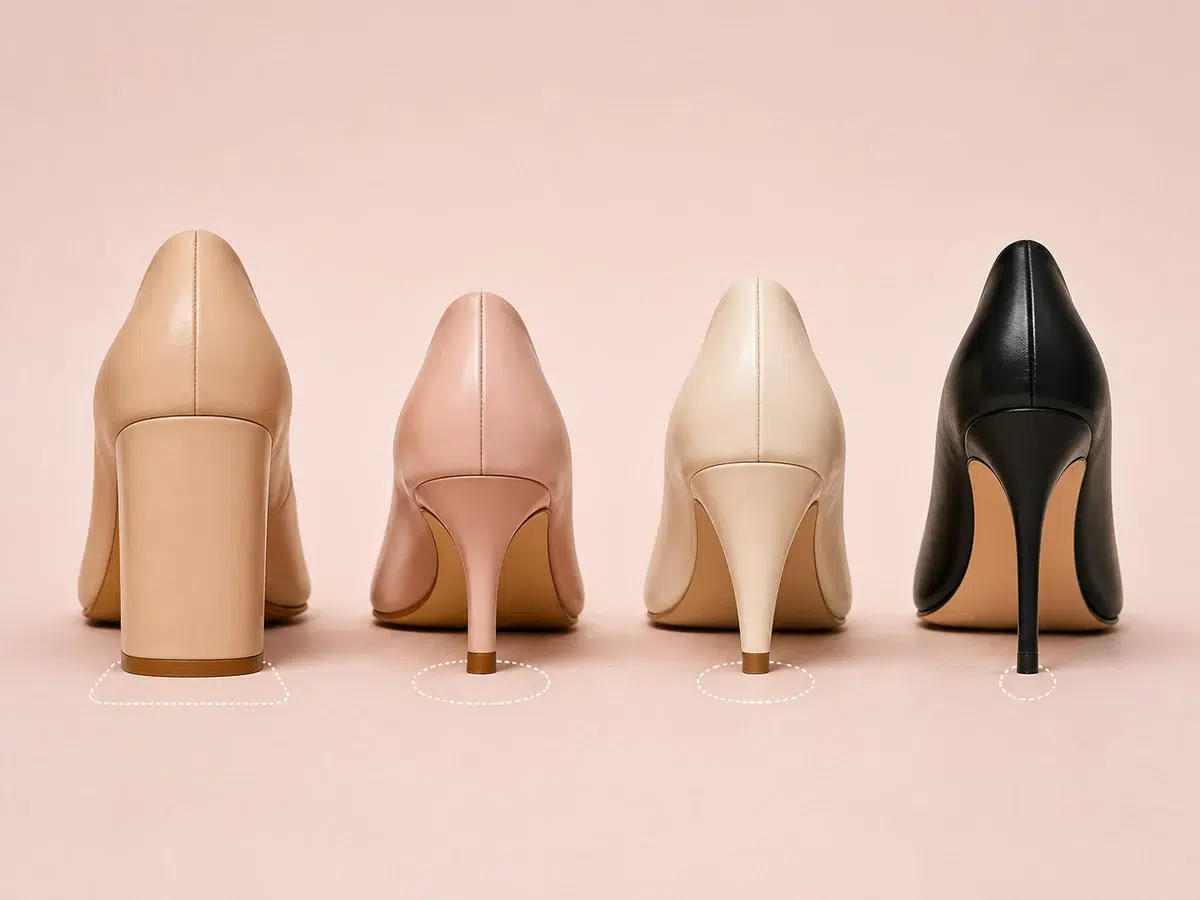
Understanding Floor Contact
Why the Heel Tip Matters as Much as Heel Height
The heel tip acts as the rear support point of the shoe. As that contact area becomes narrower, there is less margin for sideways movement before your ankle must correct your balance.
This is why a four-inch block heel may feel easier than a three-inch stiletto. The lower shoe is not automatically the more stable one.
- Broad contact
- Generally the most forgiving.
- Medium contact
- A balance between appearance and support.
- Narrow contact
- Requires more precise control.
Look Beyond the Heel
Four Other Features That Influence Stability
Heel shape matters, but it works together with the rest of the shoe. Check these features before deciding whether a pair will feel secure.
-
Heel Position
A heel placed beneath your weight usually feels more supportive than one positioned too far back.
-
Ankle Support
Secure straps can reduce movement and help keep the foot correctly positioned.
-
Sole Flexibility
A sole that bends correctly at the forefoot supports a smoother walking motion.
-
Correct Fit
Slipping, pinching or excessive movement reduces control regardless of the heel shape.
Understanding Platform Shoes
How Platforms Change Effective Heel Height
A front platform can make a high heel feel less steep than its visible measurement suggests. This part of the heel height guide explains how platform depth changes the effective heel height, foot angle and overall walking experience.
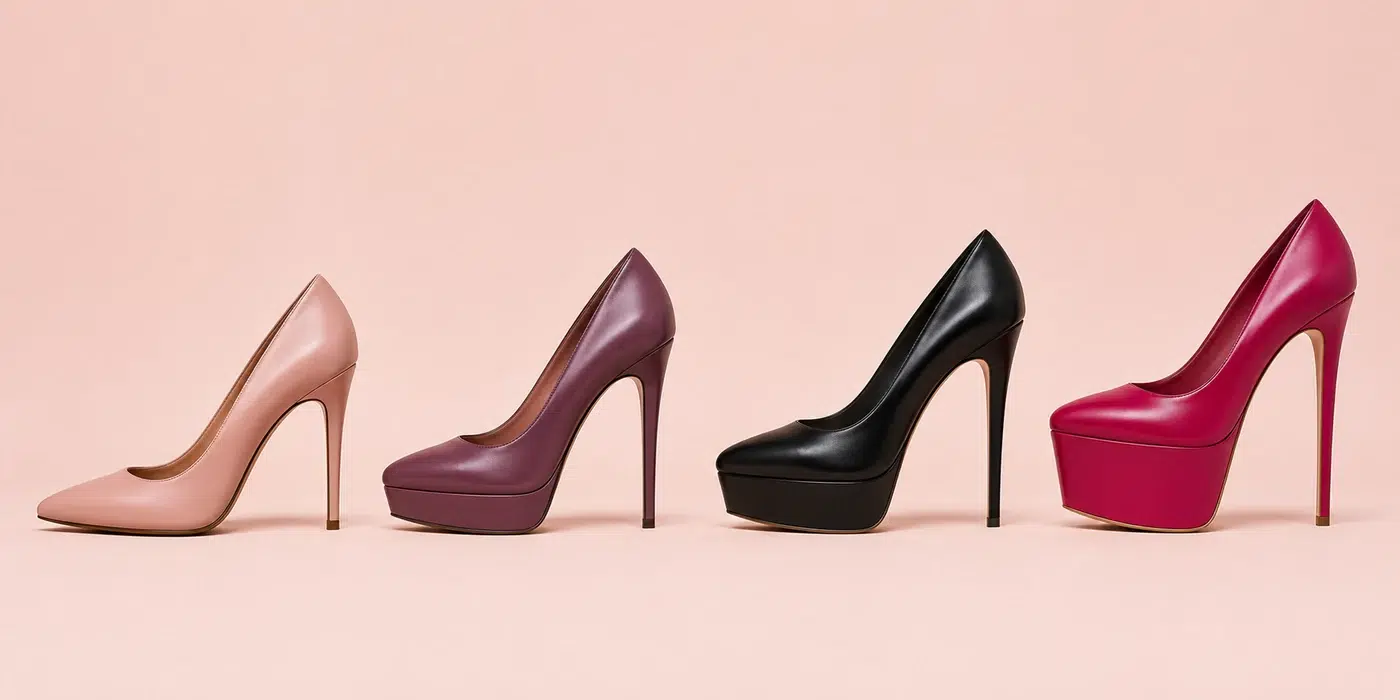
Compare Platform Depths
How Different Platforms Change the Wearing Experience
A deeper platform usually reduces the effective incline, but overall height, rigidity, heel width and shoe fit remain important.
-
Little or No Platform
Most of the Visible Heel Height Is Felt
With little or no platform beneath the forefoot, the rear measurement closely reflects the effective incline. A four-inch thin-soled heel therefore feels close to its full advertised height.
- Steeper foot and ankle angle.
- More pressure beneath the forefoot.
- Greater demand on balance and flexibility.
-
Small Platform
A Modest Reduction in Effective Height
A small platform can slightly reduce the foot angle without dramatically changing the appearance of the shoe. Even half an inch may make a high heel feel more manageable.
- Slightly gentler incline.
- Some additional forefoot cushioning.
- Traditional high-heel appearance.
-
Medium Platform
More Visible Height with Less Incline
A medium platform allows the rear heel to appear taller while keeping the foot angle closer to that of a lower heel. The shoe may still feel heavier and less flexible.
- Noticeably reduced effective height.
- Greater total height above the floor.
- More structure beneath the foot.
-
Deep Platform
A Lower Incline Does Not Guarantee Easy Walking
A deep platform can substantially reduce the effective heel height, but the wearer remains much higher above the floor. Weight, rigidity and reduced ground feedback can still make the shoe demanding.
- Substantial total shoe height.
- Less awareness of the walking surface.
- More leverage during sideways movement.
Compare Two Shoes
The Same Effective Height Can Feel Different
Example One
Four-Inch Heel with No Platform
- Effective heel height
- Approximately 4″
The foot experiences almost the full four-inch incline. Although the shoe is visibly lower, it may feel steeper beneath the arch and forefoot.
Example Two
Six-Inch Heel with a Two-Inch Platform
- Effective heel height
- Approximately 4″
The foot angle may resemble a four-inch heel, but the shoe remains taller, heavier and farther above the floor. It may therefore require more control.
Look Beyond the Calculation
Four Features That Change How Platform Heels Feel
Effective height is useful, but it cannot describe the complete wearing experience.
-
Overall Shoe Height
The farther the foot sits above the floor, the greater the effect of sideways movement.
-
Platform Rigidity
A rigid sole can restrict natural forefoot movement and create a heavier walking action.
-
Heel Width
A narrow stiletto can remain difficult even when a deep platform reduces the effective incline.
-
Ankle Security
Straps, enclosed backs and correct sizing help stop the foot moving inside a tall shoe.
Build Confidence Step by Step
How to Walk Confidently and Safely in Heels
Learning how to walk in heels is about developing balance, posture and controlled movement rather than forcing an exaggerated stride. This section of the heel height guide gives you a practical method for practising safely and progressing without rushing.
Start with the Foundations
Good Posture Comes Before a Feminine Walking Style
Stand upright with your shoulders relaxed, your head level and your weight centred over both feet. Avoid leaning too far forwards or backwards because either position makes balance more difficult.
Take shorter steps than you would in flat footwear. Place the heel down gently, then allow your weight to move through the ball of the foot. The movement should feel smooth, controlled and natural.
A Practical Walking Method
Six Steps for Learning How to Walk in Heels
Practise each step slowly on a clear, level surface. Increase your heel height or walking distance only when the movement feels controlled.
-
Stand Tall and Relax Your Knees
Keep your spine upright and shoulders relaxed. Avoid locking your knees so your body can respond naturally to changes in balance.
-
Take Short, Controlled Steps
A shorter stride keeps your weight closer to the supporting foot and reduces the correction required from your ankles.
-
Place the Heel Down Gently
Let the heel touch the floor before transferring your weight forwards. Do not stamp or place the entire shoe down at once.
-
Move Your Weight Smoothly
Allow your weight to pass through the shoe in a controlled movement while the supporting foot remains stable.
-
Look Ahead
Looking forwards supports upright posture and helps you identify changes in the surface before you reach them.
-
Stop Before Your Technique Deteriorates
Finish when your ankles become tired, your steps become uncontrolled or discomfort begins. Short, repeated sessions are more useful than exhaustion.
Progress Gradually
A Four-Stage Heel-Walking Practice Plan
Change one difficulty at a time. Do not increase heel height, narrow the heel and move onto harder surfaces all in the same practice session.
-
Stage One
Stable Low Heel
Begin with a one-to-two-inch block heel on a clear, level indoor floor.
Focus: posture and balance -
Stage Two
Supportive Mid Heel
Move to a two-to-three-inch heel with a secure fit and, where possible, an ankle strap.
Focus: heel-to-toe movement -
Stage Three
More Height or a Narrower Heel
Introduce either additional height or a narrower heel, but avoid changing both together.
Focus: ankle control -
Stage Four
Suitable Outdoor Surfaces
Practise short outdoor distances only after indoor walking feels consistent and controlled.
Focus: surface awareness
Create a Safe Practice Area
Where to Practise Walking in Heels
- Use a clear, level floor without loose rugs, cables or objects in your path.
- Practise near a wall or stable surface that can provide support when required.
- Avoid polished, slippery or uneven surfaces until your balance is reliable.
- Use a mirror to check posture, but continue looking ahead while walking.
Keep Practice Manageable
How Long Should You Practise?
Begin with sessions of approximately five to ten minutes. Remove the shoes, rest and assess how your feet and ankles feel before practising again.
Increase the duration only when you can maintain controlled steps without pain, excessive pressure or ankle instability.
Correct Problems Early
Six Common Heel-Walking Mistakes
-
Taking Steps That Are Too Long
An exaggerated stride moves your weight too far from the supporting foot.
-
Looking Down Continuously
Lowering your head pulls your posture forwards and reduces awareness of the space ahead.
-
Locking the Knees
Rigid legs make movement less natural and reduce your ability to correct small changes in balance.
-
Beginning with Extreme Heels
Very high stilettos or platforms add several difficulties before the basic movement is learned.
-
Wearing Poorly Fitting Shoes
Slipping, pinching or excessive movement prevents reliable foot placement.
-
Continuing Through Pain
Stop, remove the shoes and reassess their fit and heel height when pain begins.
Match the Heel to the Occasion
Choosing the Right Heel Height for Every Situation
The right heel height should suit your experience, walking distance, wearing time, surface and intended look. This section of the heel height guide gives practical starting ranges for common situations without treating the advertised height as the only factor.
Practical Starting Points
Recommended Heel Heights for Six Common Situations
These are starting ranges rather than fixed rules. Heel width, platform depth, shoe fit and ankle support can make two shoes with the same height feel very different.
-
Learning at Home
First-Time Heel Wear
- Recommended starting range
- 1–2″
A low block heel or broad kitten heel helps you learn posture, short steps and controlled weight transfer without adding unnecessary instability.
- Choose a broad, well-positioned heel.
- Practise on a clear indoor floor.
- Prioritise secure fit.
-
Everyday Feminine Styling
Daytime and Casual Wear
- Practical daytime range
- 1.5–3″
Low and medium heels can add shape while remaining practical for shopping, appointments, cafés and other daytime activities involving regular walking.
- Block, wedge and tapered heels work well.
- Allow for total walking time.
- Check pavements and transport.
-
Controlled Indoor Setting
Dressing Sessions and Photography
- Flexible styling range
- 2–4″
A dressing session or photoshoot allows more styling freedom because walking distances are usually short and the floor can be checked beforehand.
- Match the heel to the outfit and pose.
- Keep a lower alternative available.
- Use support when changing position.
-
Feminine Evening Style
Social Occasions and Evenings Out
- Typical evening range
- 2.5–4″
Medium and higher heels can create a stronger evening look, but the venue, walking distance and time spent standing should influence the final choice.
- Check the route to and from the venue.
- Consider ankle straps or enclosed backs.
- Carry lower shoes where practical.
-
Extended Wear
Long Periods of Standing or Walking
- Comfort-focused range
- 1–2.5″
Lower heels are usually easier to manage when the day includes prolonged standing, walking, stairs or changing surfaces.
- Choose suitable cushioning and width.
- Avoid very narrow heel tips.
- Test the shoes for longer wear.
-
High-Impact Styling
Statement and Very High Heels
- Experienced wearers
- 4″+
Very high heels can create a dramatic silhouette but are best suited to controlled settings, shorter wear periods and people with reliable balance.
- Check the effective platform height.
- Keep walking distances predictable.
- Do not choose by appearance alone.
Before Choosing a Pair
Five Questions to Ask Before Choosing Your Heel Height
These questions help determine whether a pair will remain practical after the initial excitement of trying it on.
-
How Far Will I Walk?
Include car parks, transport, corridors, pavements and movement inside the venue.
-
How Long Will I Stand?
A heel that feels comfortable for ten minutes may feel very different after an hour.
-
Which Surfaces Will I Encounter?
Carpet, tiles, grass, gravel, paving gaps and stairs all affect practical difficulty.
-
Does the Shoe Hold My Foot Securely?
Heel slippage, excess width and weak ankle support can make even a low heel unstable.
-
Can I Walk Naturally?
You should be able to stand upright, take controlled steps and stop without grabbing for support.
Style and Practicality
Balance the Look You Want with the Time You Will Wear It
A heel may be ideal for a short photoshoot but unsuitable for an evening involving walking, standing and uneven surfaces. Different parts of the same occasion may require different shoes.
Where practical, keep a second pair available. Changing to a lower supportive shoe preserves comfort before posture and walking control begin to deteriorate.
Short Wear
More styling freedomHigher or narrower heels may be manageable for short, controlled periods.
Longer Wear
More support requiredLower, broader and better-cushioned heels normally become the stronger choice.
Recognise the Warning Signs
When to Change into Lower Heels or Remove the Shoes
-
Your Steps Become Uncontrolled
A visible decline in walking technique often means the current heel is no longer manageable.
-
You Begin Grabbing for Support
Reaching repeatedly for walls or furniture indicates reduced balance and increasing fatigue.
-
Pain or Numbness Develops
Stop rather than forcing continued wear. Pain is not a required part of wearing heels.
-
The Shoe Begins Slipping
Movement inside the shoe reduces control and may worsen as your feet become warmer or tired.
Protect Your Feet
Heel Comfort, Foot Care and Safer Heel Wear
Comfortable heel wear depends on secure fit, sensible wearing time and recognising problems early. This section of the heel height guide explains how to prepare your feet, reduce friction, use inserts carefully and identify when your heels should be changed or removed.
Before You Put the Shoes On
Six Checks Before Wearing High Heels
A few simple checks before wearing heels can reduce rubbing, pressure and avoidable discomfort later.
-
Check the Fit While Standing
Your toes should not feel crushed, the heel should not lift excessively and your foot should remain secure without tight compression.
-
Inspect Likely Rubbing Points
Check the heel counter, toe box, straps and shoe edges for areas that may rub against the skin.
-
Keep Your Feet Clean and Dry
Damp skin is more vulnerable to friction. Dry your feet thoroughly before putting on hosiery or shoes.
-
Test New Heels Indoors
Wear new shoes briefly at home so pressure points can be identified before a longer outing.
-
Position Cushions Before Leaving
Confirm that any pads improve comfort and security rather than making the shoe too tight.
-
Plan a Lower Backup Pair
Flats or lower heels provide a practical alternative if comfort, posture or balance begins to deteriorate.
Use Support Carefully
Cushions, Pads and Inserts for High Heels
Inserts can improve comfort when they address a specific problem without overcrowding the shoe or changing the position of your foot.
-
Forefoot Gel Pads
These may soften pressure beneath the ball of the foot, particularly in thin-soled high heels.
Best for: forefoot pressure -
Heel Grips
Heel grips may reduce slight slipping and rubbing at the back of a court shoe.
Best for: minor heel movement -
Arch-Support Inserts
A low-profile insert may help, but a thick insert can raise the foot and make the shoe too tight.
Best for: additional support -
Anti-Friction Protection
Blister patches or suitable protective tape can shield known rubbing points before irritation develops.
Best for: repeated friction
Recognise Problems Early
Six Warning Signs That Mean You Should Remove the Heels
Change or remove the shoes when these symptoms begin rather than waiting for the discomfort to become severe.
-
Sharp or Increasing Pain
Pain that becomes stronger as you continue walking is a clear reason to stop.
-
Numbness or Tingling
Reduced sensation may indicate excessive pressure or compression and should not be ignored.
-
Burning Beneath the Forefoot
Burning can develop when pressure becomes concentrated beneath the ball of the foot.
-
Persistent Rubbing
Continued friction can lead to blisters or broken skin even when the first irritation seems minor.
-
Ankle Instability
Repeated wobbling may indicate fatigue, poor fit or a heel height that is too demanding.
-
Changes in Walking Style
Limping, gripping with your toes or uncontrolled steps means the footwear is affecting movement.
While You Are Wearing Heels
Reduce Pressure and Fatigue During Longer Wear
Avoid remaining in one position for long periods. Alternate between sitting, standing and short controlled walks where possible while monitoring pressure and balance.
Take a seated break or change into a lower pair before fatigue begins to affect posture and walking technique.
Short Breaks
Rest before pain developsA planned break is more useful than waiting until the shoes have already become uncomfortable.
Change of Shoes
Protect your postureMoving to lower heels can prevent tiredness from becoming visible instability.
Surface Awareness
Adapt your paceSlow down on polished floors, slopes, stairs and uneven surfaces rather than maintaining the same stride.
After Wearing Heels
Simple Foot Care After Longer Heel Wear
-
Check Your Feet
Look for redness, pressure marks, blisters or broken skin so problems can be addressed promptly.
-
Rest Your Feet
Sit comfortably and allow your feet and ankles time to recover after prolonged standing or walking.
-
Move and Stretch Gently
Gentle ankle and calf movement may reduce stiffness, but do not force movement that causes pain.
-
Review the Shoes
Identify where discomfort occurred and decide whether the fit, inserts or wear time should change.
Frequently Asked Questions
Heel Height Guide Frequently Asked Questions
Find concise answers about beginner heel heights, measuring heels, platforms, stability, walking technique and comfort. These questions bring together the key advice from the complete heel height guide.
Clear Practical Answers
Common Questions About Heel Height
Select any question to reveal the answer. The accordions use native browser controls and require no JavaScript.
What heel height is best for a beginner?
A heel between approximately one and two inches is usually a sensible starting point. Choose a block heel, broad kitten heel or low wedge with a stable contact area.
Secure fit matters more than reaching a particular height. The shoe should hold your foot without crushing the toes or allowing excessive heel movement.
How is heel height measured correctly?
Stand the shoe naturally on a level surface and measure vertically at the back, from the floor to the point where the heel joins the sole or heel seat.
Do not follow the heel diagonally because this can exaggerate the measurement. Measure any front platform separately.
Review the heel-measuring methodWhat does effective heel height mean?
Effective heel height is the approximate difference between the visible rear heel and the platform beneath the front of the foot.
This estimates the incline inside the shoe. Total height, rigidity and heel width still affect how demanding the footwear feels.
Understand platforms and effective heightAre platform heels easier to walk in?
A platform can reduce the effective incline and forefoot pressure, so some platform heels feel less steep than thin-soled shoes with the same visible heel height.
Deep platforms also raise the foot farther above the floor and can reduce surface awareness. Tall or rigid designs may therefore remain challenging.
Are block heels easier than stilettos?
Block heels are generally easier to balance in because their broader base provides more contact with the floor and requires less ankle correction.
Heel position, fit and ankle support still matter, but a block heel is usually a stronger choice for beginners and longer wear.
Compare heel shapes and stabilityWhy do two heels of the same height feel different?
Advertised height does not describe the complete shoe. Heel width, heel position, platform depth, sole flexibility, cushioning, toe shape and ankle support can all change the wearing experience.
A four-inch block heel with an ankle strap may feel more stable than a lower stiletto with a narrow heel tip and insecure fit.
How long should a beginner practise in heels?
Begin with approximately five to ten minutes on a clear, level indoor floor. Stop while posture and steps remain controlled rather than continuing until your feet or ankles become exhausted.
Several short sessions are usually more useful than one long session. Increase the duration gradually.
Review the heel-walking practice methodShould the heel or toe touch the floor first?
With most conventional heels, allow the heel to touch gently before transferring your weight smoothly through the ball of the foot towards the toes.
Avoid stamping the heel or placing the entire shoe flat at once. Short, controlled steps are usually easier to manage.
Can gel pads make high heels comfortable?
Forefoot gel pads may reduce pressure beneath the ball of the foot, while heel grips can reduce minor slipping or rubbing in an otherwise suitable shoe.
Inserts cannot correct footwear that is significantly too short, narrow, wide or unstable. Excessive padding can create new pressure points.
Review heel comfort and foot-care adviceWhat heel height is suitable for longer wear?
For longer periods of standing or walking, a range of approximately one to two-and-a-half inches is often more practical than a very high heel.
Look for a supportive heel shape, secure fit, suitable cushioning and enough toe room. The surfaces you expect to encounter also matter.
Compare heel heights for different situationsWhen should I stop wearing a pair of heels?
Remove or change the shoes if you develop increasing pain, numbness, tingling, burning, persistent rubbing, ankle instability or uncontrolled walking.
Pain should not be treated as a necessary part of wearing heels. Persistent symptoms should be assessed appropriately.
Do higher heels always look more feminine?
No. Femininity is created by the complete outfit, proportions, posture, movement and confidence rather than heel height alone.
A lower heel worn with relaxed posture and a natural stride often looks more polished than an extreme heel that causes wobbling or visible discomfort.
Quick Reference
Heel Heights for Different Experience Levels
These are practical starting points rather than fixed limits. Heel shape, fit and shoe construction can make the same height feel easier or harder.
-
Beginner
1–2″Stable Low Heel
Choose a broad heel, secure fit and level indoor practice surface.
-
Developing Confidence
2–3″Supportive Mid Heel
Introduce more height while retaining ankle support and a manageable heel shape.
-
More Experienced
3–4″Higher Fashion Heel
Consider distance, heel width, fit and platform depth before longer wear.
-
Statement Wear
4″+Very High Heel
Best reserved for controlled settings, shorter periods and wearers with established balance.
Your Final Check
Choose the Heel Height That Gives You Confidence
The most suitable heel is not necessarily the highest one. Correct fit, effective heel height, heel shape, stability and comfort all influence how confidently you can wear a pair. Use this final heel height guide checklist before choosing your next feminine shoes.
Complete Guide Recap
Six Heel Height Principles to Remember
These six points bring together the measurement, platform, stability, walking and comfort guidance covered throughout the guide.
-
Measure the Heel Correctly
Measure vertically from the floor to the heel seat, not diagonally along the visible curve.
Review heel measurement -
Check the Effective Height
Subtract the front-platform depth from the rear heel to estimate the incline beneath your foot.
Review platform heel height -
Consider the Heel Shape
A block heel or wedge normally provides more floor contact than a narrow stiletto.
Compare heel shapes -
Match the Heel to the Occasion
Consider walking distance, standing time, transport and expected surfaces before choosing a pair.
Choose a suitable heel height -
Practise Gradually
Begin with short indoor sessions and increase either height or difficulty one step at a time.
Review heel-walking practice -
Respond to Discomfort Early
Pain, numbness, burning, rubbing or instability are reasons to stop and reassess the footwear.
Review comfort and foot care
Before You Buy
Your Final Heel Height Checklist
Use this quick check while trying on feminine footwear. Every answer should support secure, controlled and comfortable wear.
-
The shoe fits securely. My toes are not crushed and my heel does not lift excessively.
-
I understand the effective height. I have accounted for the depth of any front platform.
-
The heel shape suits my experience. I can balance without repeated ankle correction.
-
I can walk naturally. My posture remains upright and my steps stay controlled.
-
The shoes suit the occasion. I have considered distance, standing time and surfaces.
-
I have a backup plan. Lower heels or flats are available for longer wear.
Continue Your Footwear Journey
Learn More About Choosing Feminine Footwear
Heel height is only one part of choosing the right pair. The Translife Feminine Footwear Guide explains how to measure your feet, understand women’s shoe sizing and choose suitable footwear styles more confidently.